How to install laminate flooring on walls?
Laminate flooring is one of the most versatile types of flooring. It can be installed on all sorts of surfaces, including walls.
This article will give you a thorough how-to guide on how to install laminate flooring on walls. Whether you’re a homeowner or contractor, there are many reasons why you might want to install laminate flooring on the wall in your home or business.
# When to install laminate flooring on walls?
You may want to install laminate flooring on your walls if:
- You don’t have enough room for a traditional installation in your space
- You’re building an addition onto your home and need low-cost materials that will serve as the newly finished surface
- You have access to inexpensive material such as reclaimed lumber, carpet padding, or particle board that can be laminated
- You’re finishing a basement and want a fashionable inexpensive flooring solution
- You’re building a new home from scratch
- You want to cover up walls that have been stained or damaged by moisture or mold.
# Common questions when installing laminate flooring on walls
Using laminate flooring on walls is an easy way to create a unique look that will last for years. Here are some common questions people ask when it comes to installing laminate floor planks on walls.
Will installing laminate flooring on walls void the warranty?
Warranties for laminate flooring should be assessed with your vendor. Those who sell latex-backed laminates will not have the warranty voided or impacted.
In some cases, however, warranties may be voided if the product is installed in areas where it will be subjected to heavy wear and tear that may cause scuffing or damage to the performance of the laminate’s surface.
However, it’s important that you know what your rights are with the warranty. The best way to go about answering this question is to contact the manufacturer of the laminate flooring for their opinion. They may be able to clarify the warranty and what it covers in relation to installing laminate flooring on walls.
What kind of laminate should you install on walls?
There are two types of laminate flooring that you should consider for your project: matted and floating.
Matched mats have an adhesive that bonds the boards together and also allows for the boards to expand and contract according to room temperature.
Floating laminate flooring does not require any adhesive, but instead has a coating on the top side of the board that allows it to expand and contract with temperature changes easily. Both are great options, and either could work for you.
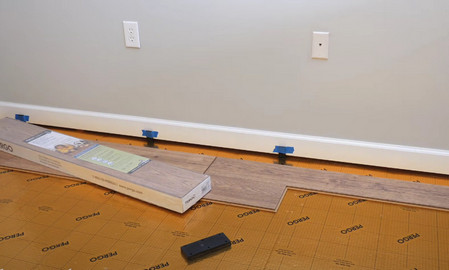
# Laminate wall installation process
The most important point to remember about installing laminate flooring on a wall is that you will have to make sure you install it properly.
Structurally sound walls
The first step in doing this is to make sure that the wall is structurally sound. Laminate flooring will not adhere to a wall that has been damaged by water, mold or other forms of moisture, so if there is evidence of moisture damage you will need to fix it before installing your laminate flooring. Make sure to choose a great place to use the laminate plank that can withstand moisture levels.
Prep the walls
Once you have ensured that the wall on which you will be installing your laminate flooring is structurally sound, you will need to pre-prepare the wall for installation.
The first step in this process is to remove anything that isn’t going to be used as part of the finished installation. This includes wallboard, old carpeting, baseboard moldings, and anything else that will not be a part of your final installation. Next, find the wall studs and mark the area.
Fix nail holes & blemishes
After you have removed anything that isn’t going to be a part of your final installation you will need to fill any nail holes or other subtle blemishes with wood filler. Let this dry before applying the laminate planks on top of it.
Apply a primer
You will also need to prime the installation wall that you will be using for your finish. This will ensure that the laminate flooring adheres better to it and lasts longer.
Lined up seams
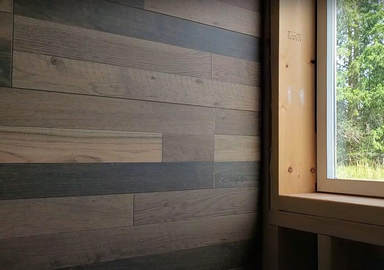
Once the primer is dry, you can begin to install your laminate flooring on the wall itself. Before you start, make sure that all of the seams are lined up and pointed in the same direction as they will be when installed on a standard wood floor.
Apply the laminate planks
After all of your seams are lined up, use a nail gun to apply the laminate flooring planks to the wall. Make sure that the nails are long enough to reach up through the laminate and into whatever’s on the other side of your wall.
When using a nail gun, you should be able to nail it all the way across the wall. Depending on the size of the wall, this may take more than one pass of staples. If your wall is very thick, then you may only want to staple every few inches.
Apply finish
The next step in installing laminate on walls on walls is to apply the finish of your choice. This will help make sure that the laminate flooring stays in place and looks even better than it did before you applied it.
One of the best finishes for your laminate flooring is polyurethane. It’s a good idea to do a test patch before you apply it to your entire wall, just in case you don’t like the way it looks or it doesn’t adhere well to the wall.
Let it dry
After applying the finish of your choice, let it dry completely before you attempt using your flooring. Even after this, however, make sure that you take care when walking on it and be prepared for any warping or other issues to arise.
# Tools & materials to install laminate flooring on walls
Laminate flooring comes in a variety of sizes based on its intended use. These sizes range from 2 feet by 2 feet to 10 feet by 10 feet. If the flooring will be applied to walls, it should be cut or trimmed to fit an 8 foot by 8-foot size.
If you plan on installing your laminate flooring on the walls of your home, certain tools and materials will be in handy.
- Utility knife to use as you cut the laminate to fit on your walls
- Paint tray
- Paint Brush will help spread out the finish and clean up any spills
- Measuring tape
- Half square template (for use with laminate walls) will help you cut the laminate to fit your walls properly.
- Coldwater & lint-free rags or towels to clean and wipe any dust or grime on the surface
- Pencil/pen
- Ladders
- Taping tools
- Other hand tools for trimming around edges and adding any molding or baseboards.
Tools for commercial installations may vary from residential and should be discussed with your local contractor or flooring professional who can recommend and guide you in your decision-making process. If you’re going the DIY route, make sure to check the flooring manufacturer’s installation guides.
# Step by step instruction on how to install laminate walls
1. To start the installation process for your laminate flooring, it should be measured. This will help you cut the laminate to fit your walls.
For measuring, a tape measure or ruler is recommended. If you are installing this type of flooring on a wall, then your starting point will either be in one corner or in the middle of the wall where you want to start. It is recommended that you carry out measurements from both ends and diagonally up to make sure that the laminate fits properly on your wall.
Once you have found your starting point, you need to measure from the other two corners and then from the middle of your wall. If you are using laminate flooring for a variety of reasons, it is recommended that you use a template so that your measurements are accurate.
Be aware of expansion gaps and make sure to account for the 3/16 gap between laminate planks and adjacent walls. Laminate planks will still expand and contract.
2. Once this is done, you will need to cut the laminate around your walls.
For this step, it is best to either use a utility knife or a saw. If you are using a utility knife, ensure that you cut in the direction of the wood grain. You should also cut only as far as necessary for the board to fit the wall.
3. Once you have cut the laminate, you will need to clean it up.
For this step, take a damp cloth and wipe any dust or grime off of your surface. A mild detergent can be used to clean any marks off your laminate flooring that may have been left by previous items attached to it.
4. Once the surface is clean and all cuts have been made, you can start your installation process.
For this step, it is best to lay down your laminate flooring so that it is easier for you to put down any adhesive that may be required for your project.
5. Once the adhesive has been applied, you can begin to put down your laminate flooring.
For this step, check to ensure that you are putting the flooring down with the proper side facing up. The seam needs to go along the wall when properly installed. This will ensure that it is less likely to be noticed later on in this project or by future individuals who want to make some changes in your space. You can use a rubber mallet to tap the plank in place.
The next step in this process is to cut any of the laminate floorings that aren’t fitting correctly. These cuts can take place between planks or at corners if needed.
When cutting along the flooring, it is best to use a sharp blade and keep your hands away from the direction you are pushing your saw. The blade may end up slicing through your skin if you are not careful.
6. The last step in the process is to make sure that any of the cuts are covered with wood glue. It is best to put a wedge of wood into the area and press it down. Then, use a roller to wipe away any excess glue that may remain.
7. Once your laminate floor planks are in place, it is recommended that you let it dry for a few days before using it.
8. After the flooring has dried, you can apply a finisher to the laminate flooring to ensure that it is protected and that any moisture or mold will not be able to penetrate it.
9. The last step for the installation process is to take a felt pen and mark any areas of concern on your laminate flooring so that you can address them later on.
# Summary and conclusion
There are various steps to ensure that your laminate flooring will be a good fit throughout the installation phase.
It is important to take the time to measure your walls along with any other details you may have such as the specific shape of your wall, and what type of adhesive and materials will be used. These factors are very important in creating your laminate flooring installation.
In order to ensure that you chose a type of adhesive that will work well for your project, you must research all the different types available for use. This information should be assessed so that you can decide what works best for your needs.