Your Ultimate Guide to Flawlessly Gluing Vinyl Flooring
No more loose vinyl floors! With our user-friendly guide, achieve perfectly glued vinyl flooring. Our method ensures a firm, durable finish that truly transforms your living space. Dive in now!
Are you considering installing vinyl flooring in your home? It’s a popular choice for its durability, affordability, and easy maintenance. However, before you start the installation process, it’s crucial to understand how to properly glue down vinyl flooring to ensure a long-lasting and secure bond.
In this ultimate guide, we’ll explore everything you need to know about gluing vinyl flooring, including the importance of the right glue, how much glue you need, and best practices for installation.
Whether you’re a DIY enthusiast or a professional contractor, this guide will provide you with the tips, techniques, and best practices to make your vinyl flooring installation a success.
So, let’s dive in and get started!
Key Takeaways
- Proper glue down is crucial for a long-lasting and secure bond.
- Key considerations when installing gluedown vinyl planks include preparing the subfloor, choosing the right adhesive, using the proper installation technique, and allowing ample drying time.
- The type of glue used can affect the durability and longevity of the floor.
- Removing glue residue from vinyl flooring is necessary for proper installation of new flooring material.
The Importance of the Right Glue for Vinyl Flooring
When it comes to installing vinyl flooring, the type of glue you use can make all the difference. Different types of glue are available for vinyl flooring, each with its own unique properties and benefits.
To ensure a successful installation, it’s important to choose the right glue for your specific vinyl flooring needs.
Why the type of glue matters
Choosing the right type of glue is crucial when installing vinyl flooring, as it can affect the durability and longevity of the floor. The type of glue that you use will depend on the type of vinyl plank floor that you have, as well as the type of subfloor that the vinyl will be installed on.
Here are three reasons why the type of glue matters when it comes to installing vinyl flooring:
- Adhesion: The right type of glue will provide a strong bond between the vinyl planks and the subfloor. This will prevent the planks from lifting or shifting over time, which can lead to damage and wear.
- Flexibility: Vinyl flooring can expand and contract with changes in temperature and humidity. The right type of glue will allow for this movement without compromising the bond between the planks and the subfloor.
- Moisture resistance: Vinyl flooring is often installed in areas that are prone to moisture, such as bathrooms and kitchens. The right type of glue will provide a barrier against moisture, preventing mold and mildew from forming underneath the flooring.
Different types of glue for vinyl flooring
Understanding the various types of glue available for vinyl flooring installation can make all the difference in achieving a long-lasting and durable floor. There are different types of glue for different types of vinyl flooring, so it’s important to choose the right one that suits your needs.
Firstly, there is pressure-sensitive adhesive, which is a popular choice for vinyl tile flooring. This adhesive is applied using a notched trowel and it sticks to the floor as soon as it is laid down.
Another type of adhesive is the water-based acrylic adhesive, which is ideal for sheet vinyl flooring. It dries quickly and is easy to clean up.
Lastly, there is the solvent-based adhesive, which is strong and durable, but can be more difficult to work with and may leave adhesive residue if not applied correctly.
Knowing which type of glue to use can save you time and money in the long run and ensure a successful vinyl flooring installation service.
How to choose the right glue for your vinyl flooring
Picking the appropriate adhesive for your vinyl flooring is crucial for a durable and long-lasting installation, so let’s explore how to make the right choice.
The first step is to carefully read the installation instructions provided by the manufacturer of your vinyl flooring. The instructions will specify the type of adhesive required and any special application techniques required.
Next, consider the type of vinyl flooring you’re installing. Luxury vinyl tile (LVT) and luxury vinyl plank (LVP) require different adhesives than sheet vinyl. Additionally, the subfloor material can impact the type of adhesive you need.
For example, concrete subfloors require a different adhesive than wood subfloors. By taking into account the specific requirements of your vinyl flooring and subfloor, you can choose an adhesive that will provide optimal adhesion and longevity for your installation.
Tips for a successful vinyl flooring installation
To ensure a successful vinyl flooring installation, it’s crucial to take the necessary steps in planning and measuring out the layout of the room. This ensures a smooth and stress-free process, and can prevent costly mistakes in the long run.
Before beginning the installation, make sure to thoroughly clean and prepare the subfloor. Any debris or imperfections could affect the adhesion of the glue, leading to an unsuccessful installation.
When planning the layout, it’s important to consider the direction of the vinyl planks and the placement of seams. You’ll want to start in the center of the room and work your way outwards, making sure to leave a small gap around the edges for expansion.
Additionally, taking the time to properly cut the vinyl planks to fit the room will ensure a seamless and professional-looking installation.
Following these tips and taking the time to plan and prepare will lead to a successful vinyl flooring installation that will last for years to come.
How Much Glue Do You Need for Vinyl Flooring?
When it comes to gluing down vinyl flooring, figuring out the right amount of glue to use can be tricky. But don’t worry, you can easily estimate the amount of glue you’ll need by considering a few key factors.
These factors include the size of your project, the type of vinyl flooring you’re using, and the condition of your subfloor. By taking these factors into account, you can ensure that you have enough glue to get the job done right.
Factors that determine the amount of glue needed
You’ll want to consider a few factors before determining how much glue you’ll need, so you can ensure a secure and long-lasting vinyl floor installation. Here are some of the main factors that should be taken into account:
- Type of vinyl flooring: Different types of vinyl flooring may require different amounts of glue. For instance, thicker vinyl flooring may require more glue to ensure it adheres properly to the subfloor.
- Subfloor type: The type of subfloor you have will also impact the amount of glue you need. A concrete subfloor may require more glue than a wooden subfloor, for example.
- Room temperature: The temperature of the room where you’re installing the vinyl flooring can also affect the amount of glue needed. In colder temperatures, you may need to use more glue to ensure a strong bond.
- Humidity: High levels of humidity can impact the adhesive properties of the glue. This may require you to use more glue to compensate for the moisture.
By taking these factors into account, you can determine the appropriate amount of glue needed for your vinyl flooring installation. This will help you ensure a secure and long-lasting installation that will stand the test of time.
How to estimate the amount of glue for your project
Estimating the amount of glue needed for your vinyl flooring project is straightforward when you follow a systematic approach. Below, we’ve provided an organized list of steps that you can refer to for guidance:
- Measure the Area: Begin by determining the square footage of your project area. You can do this by measuring the length and width of the room and multiplying these two values.
- Review Manufacturer’s Instructions: Next, it’s crucial to check the manufacturer’s instructions. Look for the recommended coverage rate per square foot. This information is typically provided on the glue container or on the vinyl flooring packaging.
- Calculate the Amount of Glue: Multiply the square footage of your project area by the manufacturer’s recommended coverage rate. This calculation will give you an estimate of the amount of glue you need for your project.
- Consider Other Factors: It’s important to take into account any additional factors that may impact the amount of glue you need. These factors can include the condition of the subfloor, the type of vinyl flooring you’re installing, and the specific installation method you’re using.
- Account for Extra Needs: If your subfloor is uneven or damaged, it may require more glue to ensure a secure and level installation. It’s generally advisable to purchase a little more glue than your estimate indicates to avoid running out mid-project.
By following these steps and keeping these considerations in mind, you’ll be well-equipped to estimate the quantity of glue you require for your vinyl flooring project.
How to Glue Down Vinyl Flooring
If you’re planning to install vinyl flooring using glue, it’s important to prepare the floor properly.
This will ensure that the vinyl adheres well and lasts for years to come.
In this section, we’ll provide you with a step-by-step guide to gluing down vinyl flooring, as well as some tips for a successful installation.
With the right techniques, you can achieve a beautiful and durable vinyl floor that will add value to your home.
Preparing the floor for gluing
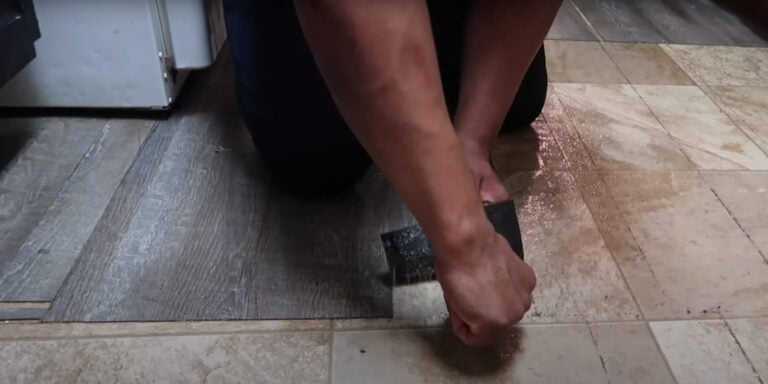
First, preparing the floor is crucial before gluing vinyl flooring. For concrete subfloors, make sure that the surface is clean and free of debris. Any bumps or rough spots should be smoothed out with sandpaper or a scraper tool to ensure that the adhesive can bond properly.
Additionally, check the levelness of the subfloor by using a level tool. If the subfloor is not level, use a self-leveling compound to even it out before applying adhesive. For wood subfloors, ensure that the subfloor is structurally sound and free of any loose or damaged areas.
Sand down any rough spots and make sure the surface is clean before applying adhesive. It’s also important to check the moisture content of the subfloor to prevent any future issues with the vinyl flooring.
Preparing the floor properly will ensure a successful and long-lasting installation.
Step-by-step guide to gluing down vinyl flooring
Now that the floor is properly prepared, let’s get started on the actual installation process and make your vision a reality! The following step-by-step guide will help you glue down your vinyl flooring with ease and precision.
- Apply the adhesive: Start by applying the recommended adhesive to the subfloor using a trowel. Spread the adhesive evenly over a small section of the floor, making sure not to spread too much at once.
Pro tip: If you’re working in a large area, divide it into smaller sections to avoid the adhesive drying out before you have a chance to lay the vinyl flooring down.
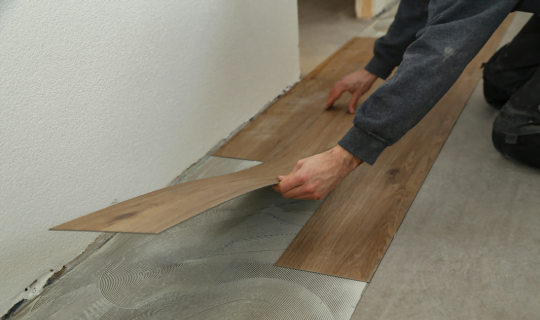
- Lay the vinyl: Carefully lay the vinyl flooring over the adhesive, taking care to align it with the edges of the room. Smooth out any bubbles or wrinkles using a roller or your hands.
Pro tip: Be sure to leave a small gap around the edge of the room to allow for expansion and contraction of the vinyl.
Repeat steps 1 and 2 until the entire floor is covered.
Following these steps will ensure a successful gluing down of your vinyl flooring. Happy installing!
How to Install Glueless Vinyl Flooring
Are you considering installing vinyl flooring without glue? Glueless vinyl flooring is a popular option that doesn’t require any adhesive. This type of flooring is easy to install and can be done by following a step-by-step guide.
Let’s take a closer look at how to install glueless vinyl flooring.
What is glueless vinyl flooring?
Looking for an easy and hassle-free vinyl flooring installation? Glueless vinyl flooring might just be the perfect solution for you! As the name suggests, glueless vinyl flooring does not require the use of adhesive or glue during installation. Instead, the vinyl planks or tiles are designed to interlock with each other, creating a secure and stable floor without the need for any additional adhesives.
Glueless vinyl flooring is a popular choice for DIY enthusiasts and homeowners who want to save time and money on installation costs. Not only is it easy to install, but it also provides a durable and low-maintenance flooring solution that can withstand heavy foot traffic and spills. Plus, without the installation of glue, there is no need to worry about any lingering odors or fumes that may come with traditional glue-based installations. Check out the table below for a quick comparison of the benefits and drawbacks of glueless vinyl flooring versus the installation of glue.
| Glueless Vinyl Flooring | Installation of Glue |
|---|---|
| Easy to install | Requires additional adhesive |
| Low maintenance | Strong odors and fumes during installation |
| Interlocking design | Longer installation process |
| No glue required | More expensive installation costs |
| Durable and long-lasting | Messy cleanup process |
Step-by-step guide to installing glueless vinyl flooring
Now that you know what glueless vinyl flooring is, it’s time to learn how to install it. The good news is that installing glueless vinyl floors is a relatively simple process that you can tackle on your own. With the right tools and a bit of patience, you can have beautiful new floors in no time.
To get started with installing glueless vinyl flooring, follow these steps:
- Prepare the subfloor by cleaning it thoroughly and making sure it’s level.
- Lay down an underlayment to help with sound absorption and moisture resistance.
- Measure and cut the vinyl planks to fit your space.
- Lay the planks down in a staggered pattern, starting in one corner of the room.
- Finish the installation by trimming the edges and adding transition pieces as needed.
As you work through these steps, keep in mind that a little bit of preparation goes a long way. Taking the time to properly prepare your subfloor and measure your planks will ensure a smooth and successful installation. And with glueless vinyl flooring, you’ll be able to enjoy your beautiful new floors without any mess or hassle.
How to Reglue Vinyl Flooring
If you notice that your vinyl flooring is starting to lift or come loose, it may be time to reglue it. This could be due to moisture, improper installation, or simply wear and tear over time.
Fortunately, regluing vinyl flooring is a relatively simple process that you can do yourself. In this guide, we’ll walk you through the step-by-step process to ensure a successful repair.
When and why you might need to reglue vinyl flooring
Sometimes, vinyl flooring can come loose due to wear and tear, humidity, or improper installation, requiring a regluing process to ensure its longevity and stability. If you notice any bubbling, curling, or lifting of your vinyl flooring, it might be time to reglue it. Additionally, if you plan on installing new vinyl flooring over an existing one, regluing is necessary to create a smooth and even surface.
When regluing vinyl flooring, it’s important to follow best practices to ensure a successful and long-lasting outcome. Before starting the process, make sure to clean the surface thoroughly and remove any debris or old adhesive. Then, choose a high-quality adhesive that is compatible with your specific type of vinyl flooring. To help you choose the right adhesive, here’s a table outlining some popular options and their features:
| Adhesive | Features |
|---|---|
| Pressure-sensitive adhesive | Easy to apply, can be repositioned, suitable for small areas |
| Contact adhesive | Strong bond, fast drying, suitable for large areas |
| Epoxy adhesive | Durable, water-resistant, suitable for high-traffic areas |
| Urethane adhesive | Flexible, water-resistant, suitable for uneven surfaces |
Following these best practices and choosing the right adhesive will ensure a successful regluing process and prolong the life of your vinyl flooring.
Step-by-step guide to regluing vinyl flooring
If you’ve noticed your vinyl flooring starting to come loose, it’s time to take action. Regluing vinyl flooring can prevent further damage and extend the lifespan of your floors. In this step-by-step guide, we’ll walk you through the process of regluing your vinyl flooring so you can tackle the task with confidence.
First, gather the necessary tools and materials. You’ll need adhesive, a trowel, a roller, a utility knife, and a measuring tape. Once you have everything you need, follow these steps:
- Clean the area thoroughly: Before applying any adhesive, make sure your floors are clean and free of debris.
- Apply the adhesive: Use the trowel to apply the adhesive to the subfloor, making sure to spread it evenly.
- Lay the vinyl: Carefully lay the vinyl back down onto the subfloor, making sure it is aligned properly.
- Roll the vinyl: Use the roller to press down firmly on the vinyl, smoothing out any bubbles or wrinkles.
- Trim the edges: Use the utility knife to trim any excess vinyl from the edges of the room.
By following these steps, you can successfully reglue your vinyl flooring and enjoy a smooth, secure, and long-lasting surface.
Frequently Asked Questions
Conclusion
Congratulations! You’re now equipped with the ultimate guide to gluing vinyl flooring. By understanding the importance of the right glue for vinyl flooring and following the proper techniques for installation, you can ensure a durable and long-lasting result.
Remember to measure the amount of glue needed carefully and to allow ample time for the glue to set before walking on the newly installed flooring.
If you prefer a glueless installation, make sure to choose a high-quality product and carefully follow the manufacturer’s instructions.
And if you ever need to remove or reglue your vinyl flooring, you now have the knowledge to do it properly and efficiently.
With these tips and best practices, you can confidently tackle your vinyl flooring projects and enjoy a beautiful and functional finished product.