Effortless Vinyl Floor Cleaning: Remove Adhesive Like a Pro!
Struggling with adhesive on your vinyl flooring? Our comprehensive guide provides step-by-step instructions on how to effectively remove adhesive, leaving your floors looking as good as new.
Vinyl flooring is a popular choice for many homeowners due to its durability and easy maintenance. However, sometimes adhesive or glue may need to be removed from the vinyl surface. There can be various reasons to remove glue from vinyl flooring, such as when replacing the flooring, fixing a sticky residue left by a previous installation, or removing accidental spills of glue or adhesive.
Regardless of the reason, it is important to know the right methods and techniques to safely and effectively remove glue from vinyl flooring without causing any damage. In this article, we will provide step-by-step instructions on how to get adhesive off vinyl flooring using common household items and products, ensuring a clean and adhesive-free surface.
Key Takeways
- The first step to remove adhesive from vinyl flooring is to soften it using a hairdryer or heat gun.
- After softening the adhesive, scrape it off gently with a plastic scraper to avoid damaging the floor.
- For stubborn adhesive, apply a solvent like rubbing alcohol or acetone and let it sit for a few minutes before scraping.
- After removing the adhesive, clean the area with warm soapy water to remove any residue.
- Finally, dry the area thoroughly to prevent moisture damage and ensure the floor is ready for use.
What You Will Need
To remove adhesive from vinyl flooring, you will need a few supplies to make the process easier. Here’s a list of what you will need:
1. Small plastic scraper: This tool will help you gently scrape away the adhesive without causing any damage to the vinyl surface.
2. Clean cotton cloths: These cloths will be used to wipe away any residue or excess glue that you remove from the floor.
3. Acetone-based nail polish remover: Nail polish remover contains acetone, which is an effective solvent for breaking down adhesive. Ensure that the nail polish remover you choose is acetone-based for maximum effectiveness.
4. Bucket of warm water: Warm water will be used to dilute any cleaning agents and help soften the adhesive for easier removal.
Remember to always wear protective equipment like latex hand gloves, goggles, and a mask when handling cleaning agents. These safety precautions will protect you from any potential harm.
By having these supplies on hand, you can effectively remove adhesive from vinyl flooring without causing any damage to the surface.
Removing Glue with Warm Water and a Dry Cloth
When it comes to removing adhesive from vinyl flooring, you don’t always need harsh chemicals or specialized products. In fact, using warm water and a dry cloth can be an effective and gentle method for removing glue residues. This simple technique is perfect for situations where the glue is not excessively thick or stubborn. Get ready to say goodbye to sticky residue as we guide you through the easy process of removing glue with warm water and a dry cloth.
1. Prepare your materials: Start by gathering a clean, dry cloth and a bucket of warm water. Ensure that the cloth is free from any debris or dirt that could scratch the vinyl surface.
2. Test a small area: Before proceeding, it’s essential to test the method on an inconspicuous location of the vinyl floor. This step will help you determine how the flooring reacts to warm water and whether it causes any damage.
3. Dampen the cloth: Dip the cloth into the bucket of warm water and wring out any excess liquid. You want the cloth to be slightly damp but not dripping wet.
4. Apply the warm water: Gently rub the damp cloth over the area with the glue residue. The warmth of the water will help soften the adhesive, making it easier to remove.
5. Rub in circular motions: Using circular motions, apply light pressure with the damp cloth and work on the glue residue. This motion will aid in loosening the adhesive from the vinyl surface.
6. Wipe away the glue: As you continue to rub, you will notice the glue transferring onto the cloth. Periodically inspect the cloth to see if the glue residue is coming off effectively. If needed, moisten the cloth again with warm water.
7. Dry the area: Once you have removed the glue, use a dry cloth to wipe away any excess moisture from the vinyl floor surface.
8. Inspect and repeat if necessary: After the area has dried, inspect it to ensure all traces of glue have been successfully removed. If any residue remains, repeat the process by dampening the cloth with warm water and continuing to rub gently until the glue is gone.
By using warm water and a dry cloth, you can effectively remove glue from vinyl flooring without causing any damage. This method is particularly useful for thinner or less stubborn glue residues. Remember to always test on a small, inconspicuous area before applying the technique to larger sections of the floor.
Gather Supplies
To effectively remove adhesive from vinyl flooring, it’s important to gather the necessary supplies and equipment. Here’s a list of what you’ll need:
1. Gloves, goggles, and a mask: Personal protection should always be a priority when working with chemicals or sharp tools.
2. Small plastic scraper: This will help in gently scraping off any excess glue or sticky residue without damaging the vinyl surface.
3. Clean cotton cloths: These will be used for various cleaning steps, such as applying solvents or wiping away residue.
4. Acetone-based nail polish remover: This type of nail polish remover contains acetone, which is effective in dissolving adhesive. Look for one specifically labeled as acetone-based.
5. Bucket of warm water: Warm water is useful for soaking and loosening tougher glue stains.
6. Bowl of water: This can be used to rinse off the vinyl floor surface after applying solvents or cleaners.
7. White cloth or paper towels: These will come in handy for blotting and absorbing excess moisture or cleaning solutions.
8. Isopropyl alcohol or odorless mineral spirits or Goof Off: These solvents can be used to further dissolve and remove adhesive residues. Choose the solvent that is suitable for the type of glue you’re dealing with.
9. pH neutral cleaner: After removing the adhesive, clean the vinyl floor surface with a gentle pH neutral cleaner to ensure it’s thoroughly clean and residue-free.
By gathering these supplies and equipment, you’ll be well-prepared to tackle any type of adhesive on your vinyl flooring while keeping yourself protected. Remember to follow the instructions and safety precautions provided with each product and work in a well-ventilated area.
Prepare the Surface
Before proceeding with the removal process, it is important to properly prepare the surface of the vinyl flooring. This will ensure effective and safe removal of the glue residue.
To prepare the surface, start by gently peeling off any visible sticky residue using a plastic scraper. Make sure to apply gentle pressure to avoid damaging the vinyl flooring. It is recommended to scrub horizontally rather than vertically to prevent any potential floor damage.
Once the visible residue has been removed, take a damp cloth and wipe the surface clean. This will help eliminate any remaining residue or loose particles on the vinyl flooring, preparing it for the next steps in the removal process.
By properly preparing the surface beforehand, you can ensure a more efficient and successful removal of glue from vinyl flooring. Remember to approach the task with care to prevent any damage to the floor.
Soak the Cloth in Warm Water
Soaking a cloth in warm water can be an effective solution for removing glue from vinyl flooring. Here’s how you can do it:
1. Start by filling a bucket with warm water. Make sure the water is not too hot to avoid damaging the vinyl surface.
2. Add a few drops of dishwashing liquid to the warm water. The dishwashing liquid will help break down the adhesive properties of the glue.
3. Mix the water and dishwashing liquid thoroughly until it produces bubbles.
4. Take a clean cloth and fully immerse it in the warm soapy water mixture. Allow the cloth to soak for a few minutes, ensuring it absorbs the soapy solution.
5. Wring out any excess water from the cloth, ensuring it is damp but not dripping wet.
6. Gently wipe the cloth over the area with the glue residue on the vinyl flooring. Apply some pressure and scrub in circular motions to help loosen the glue.
7. Continue to wipe the area with the damp cloth, regularly rinsing it in the warm soapy water to remove any accumulated glue on the cloth.
8. Once the glue has been lifted from the vinyl surface, use a clean cloth soaked in clean water to wipe away any remaining residue.
Remember to always test the warm soapy water mixture on a small inconspicuous area of the vinyl flooring first to ensure it does not cause any damage.
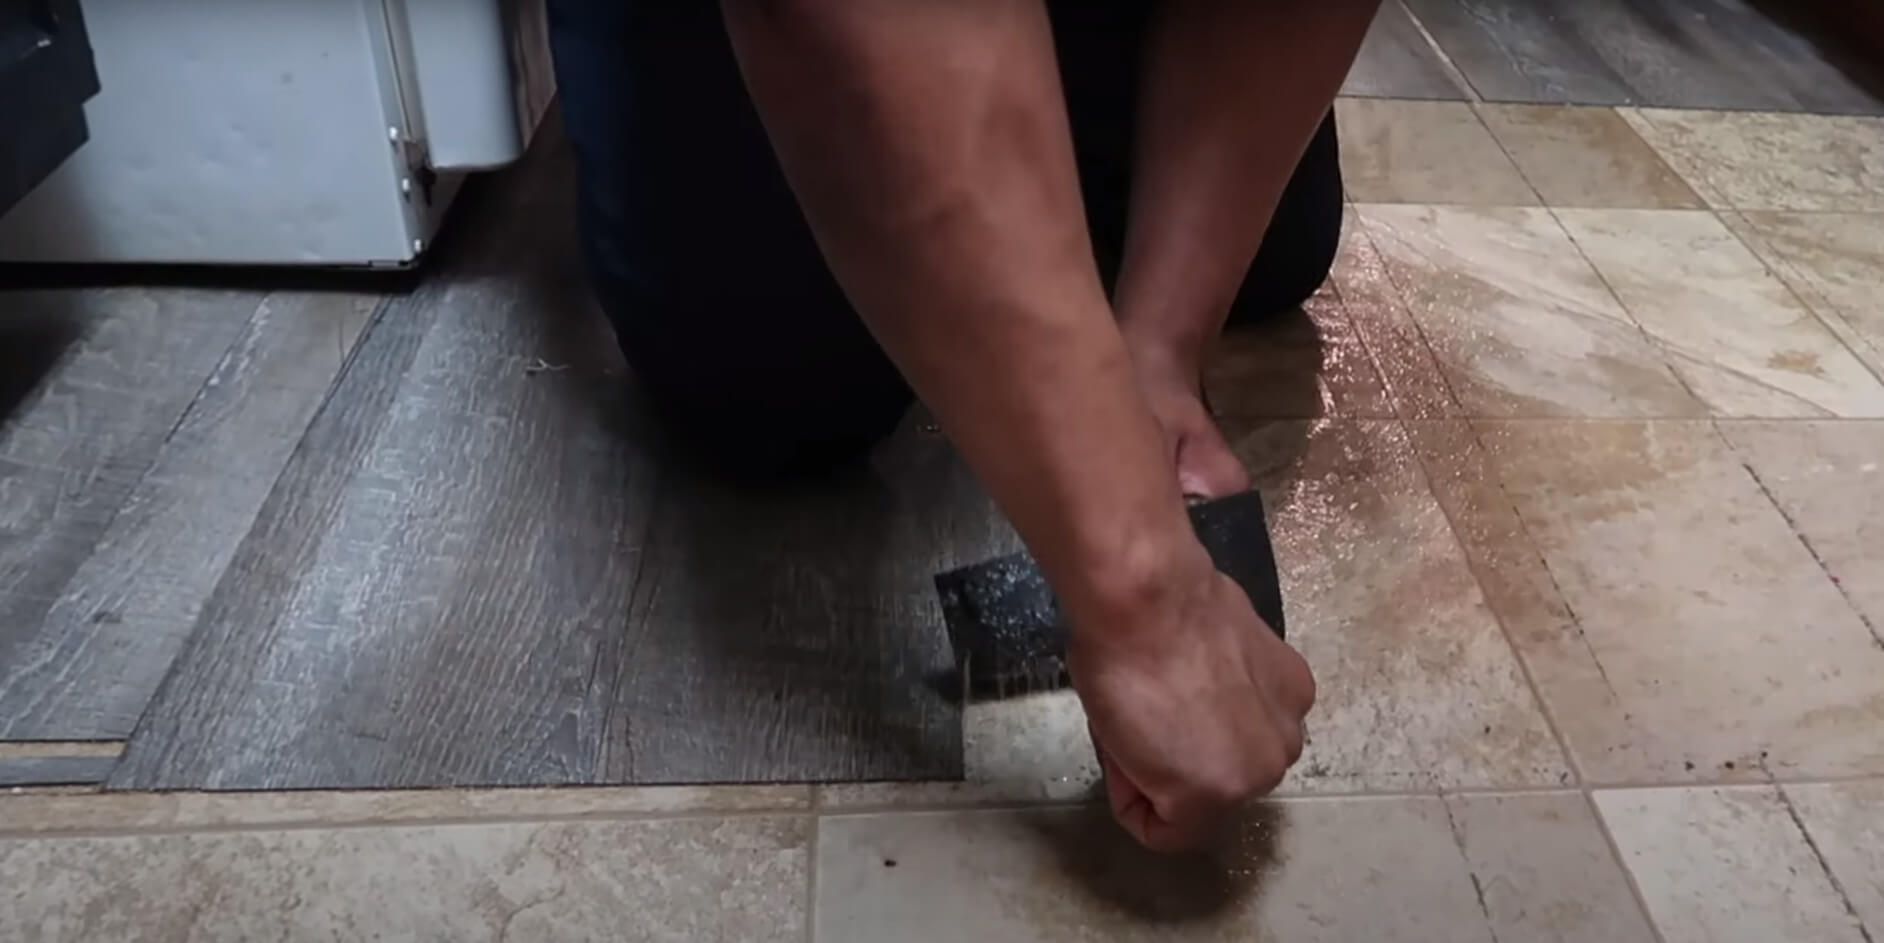
Wipe Away the Excess Glue
Excess glue on vinyl flooring can be both unsightly and detrimental to the longevity of your floors. It is important to remove any excess glue to maintain the appearance and integrity of the vinyl surface. Here are the steps to wipe away the excess glue:
1. Start by using a wooden board with a straight edge. This will be your tool to flatten the excess glue on the floor.
2. Position the wooden board at an angle, slightly pressing it against the edge of the excess glue. Apply gentle pressure to flatten and smooth out the glue.
3. Work your way along the edges of the vinyl floor that have already been laid, using the wooden board to flatten any excess glue that may have seeped out.
4. Be careful not to press too hard, as this can damage the vinyl surface. Apply just enough pressure to flatten the glue.
5. Continue this process along all the edges of the vinyl flooring until all excess glue has been flattened.
6. Once the excess glue has been flattened, use a clean cloth or towel to wipe away any residue that may have been left behind.
By following these steps, you can effectively wipe away the excess glue from your vinyl flooring, ensuring a clean and seamless appearance. Remember to be cautious while using the wooden board and to regularly check your progress to avoid any damage to the vinyl surface.
Rinse and Dry the Area Thoroughly
After successfully removing the glue from your vinyl flooring, it is crucial to thoroughly rinse and dry the area to prevent any potential damage. Leaving behind moisture can harm the floor and compromise its integrity.
To begin, use clean water to rinse the area where the glue was removed. Dampen a cloth or mop with warm water and gently wipe down the surface, ensuring that all traces of the residue are eliminated. Pay close attention to edges and corners where sticky residue may still be present.
After rinsing, it is essential to dry the area completely. Use a dry cloth or mop to absorb any remaining moisture on the vinyl surface. Ensure that no water droplets are left behind, as these can seep into the flooring and cause damage over time.
Allow the floor to air dry naturally or use a fan to expedite the drying process. Make sure the room is well-ventilated to aid in evaporation.
By thoroughly rinsing and drying the area, you can safeguard your vinyl flooring from any potential moisture damage. Remember to always follow these steps to maintain the longevity and beauty of your vinyl floor.
Removing Glue with Chemical Solvents
If the adhesive on your vinyl flooring is stubborn and cannot be easily removed with water alone, you may need to turn to chemical solvents to get the job done. It’s important to note that using chemical solvents should be a last resort and only used in well-ventilated areas. Before attempting to remove the glue, test the solvent on an inconspicuous location of the floor to ensure it does not cause any damage or discoloration.
One commonly used solvent for removing glue is acetone-based nail polish remover. This powerful solvent can effectively break down and soften glue residues on vinyl flooring. You can apply a small amount of acetone-based remover to a clean cotton cloth and gently rub the affected area in circular motions. Be careful not to rub too vigorously to avoid damaging the vinyl surface.
If acetone-based nail polish remover is not available, there are other household items that can be used as solvents for tougher glue stains. Rubbing alcohol, white vinegar, or even WD-40 can be effective in softening and removing glue residues. Apply a small amount of the chosen solvent to a clean cloth and gently rub the glue marks until they start to dissolve.
After applying any solvent, rinse the area with warm water to remove any residue. Dry the floor thoroughly with a clean, dry cloth and ensure that all traces of the solvent have been removed. If you are dealing with excessive glue marks or a large amount of glue, it may be best to consult a professional cleaner or flooring expert for further assistance.
Choose an Appropriate Solvent
When it comes to removing adhesive from vinyl flooring, choosing the right solvent is crucial. An appropriate solvent should be both friendly with the vinyl surface and effective in loosening the hardened sticky residue. Start by checking the manufacturer’s directions for any recommended solvents, as they may offer specific guidance.
If there are no specific recommendations, proceed with caution. Acetone-based nail polish remover is a commonly used solvent that can effectively break down and soften glue residues on vinyl flooring. However, it’s important to test this solvent on an inconspicuous area first to ensure it doesn’t cause any damage or discoloration.
If acetone-based nail polish remover is not an option, there are other household items that can be used as solvents for tougher glue stains. Rubbing alcohol and white vinegar are mild yet effective solvents that can help loosen the adhesive. Similarly, WD-40 can be used as a solvent to remove certain types of glue residues.
Remember, always follow the manufacturer’s directions and recommendations for the best results. Additionally, use solvents in a well-ventilated area and take caution not to excessively rub or damage the vinyl flooring during the process.
Test for Colorfastness on a Discrete Area of the Flooring
Before using any solvent or cleaning solution on your vinyl flooring, it is crucial to test for colorfastness on a discrete area. This will help determine whether the chosen solvent or cleaning solution may cause any discoloration or damage to the floor.
To perform the colorfastness test, select a hidden or inconspicuous area of the vinyl flooring. Apply a small amount of the solvent or cleaning solution onto a clean cotton cloth, and gently rub it onto the area. Make sure to use circular motions when applying the solution.
Observe the test area closely for any signs of discoloration or damage. If there are no noticeable changes or negative effects on the flooring, it is generally safe to proceed with using the solvent or cleaning solution on the adhesive.
By conducting this colorfastness test, you can avoid potential harm or unsightly marks on your vinyl flooring. This step ensures that the chosen solvent or cleaning solution is suitable for use and will not cause any unwanted discoloration or damage. Taking the time to test beforehand guarantees a smooth and successful adhesive removal process without any detrimental effects to your vinyl flooring.
Follow Safety Precautions When Using Chemicals
When using chemicals to remove glue from vinyl flooring, it is important to follow certain safety precautions to protect yourself and the flooring. First and foremost, always work in a well-ventilated area to ensure proper air circulation and prevent inhalation of any fumes or vapors.
Wearing gloves and protective goggles is also essential to safeguard your skin and eyes from any potential harm caused by the chemicals. It is important to read and carefully follow the manufacturer’s instructions for the specific adhesive remover or solvent you are using.
Before applying the solvent or cleaning solution to the entire flooring, it is crucial to test it on an inconspicuous area of the vinyl surface. This will help determine any adverse reactions or negative effects on the flooring before proceeding further.
Avoid using abrasive cleaning agents or pads, as these can cause damage to the vinyl surface. Instead, opt for gentle cleaning methods, such as using a soft cloth or sponge.
By adhering to these safety precautions, you can effectively and safely remove glue from vinyl flooring, ensuring the longevity and appearance of your floors.
Soak a Clean Cloth in Solvent Solution and Wipe Away Residue
To remove glue from vinyl flooring, one effective method is to soak a clean cloth in a solvent solution and use it to wipe away the residue. Start by applying a stripping solvent to the affected area, allowing it to sit for a few minutes to loosen the adhesive residue. Be sure to carefully follow the manufacturer’s instructions for the specific solvent you are using.
Next, soak a clean cloth in the solvent solution and gently wipe away the residue. It’s important to use a clean cloth to avoid spreading the glue or causing additional damage to the vinyl surface. Work in small sections, applying moderate pressure as needed to remove the adhesive.
Throughout the process, it’s crucial to regularly rinse the cloth in clean water to prevent the spread of glue residue. This will help maintain the effectiveness of the solvent and ensure a thorough cleaning. Once the residue is completely removed, thoroughly rinse the flooring with clean water and allow it to dry.
Remember to always wear gloves and protective goggles when using solvent solutions to protect your skin and eyes from potential harm. Additionally, test the solvent on an inconspicuous area of the vinyl surface to ensure it does not cause any damage or discoloration before applying it to the entire flooring.
Rinse and Dry the Area Thoroughly
After removing the glue residue from your vinyl flooring, it’s important to thoroughly rinse and dry the area to ensure a clean and pristine finish.
To start, rinse the flooring with clean water. This step is crucial as it helps to remove any remaining residue or solvent solution that may have been left behind during the cleaning process. Using a clean mop or cloth, thoroughly wet the floor with clean water, working in small sections at a time.
As you rinse the flooring, keep an eye out for any traces of glue or sticky residue that may still be present. Pay close attention to corners and edges where adhesive can often hide. If you notice any leftover residue, you can repeat the previous steps using the solvent solution to target those specific areas.
Once you have finished rinsing, it’s time to dry the area. Use a clean microfiber cloth or mop to thoroughly remove any moisture from the vinyl surface. Pay special attention to corners and edges to ensure no moisture is left behind. This step is vital as any lingering moisture can attract dirt and dust, potentially causing damage to the flooring and requiring further cleaning.
By following these steps and thoroughly rinsing and drying the area, you can ensure a clean and adhesive-free vinyl flooring surface. Remember, regular maintenance and prompt removal of any glue or adhesive will contribute to the longevity and overall beauty of your vinyl flooring.
Removing Super Glue from Vinyl Flooring
Removing Super Glue from Vinyl Flooring requires a careful and step-by-step approach to ensure the safety and preservation of the flooring surface. Here’s a guide on how to effectively soften and scrape off the super glue:
1. Test in an inconspicuous area: Before applying any product, test it in a small, hidden area of the vinyl flooring to ensure it doesn’t cause any damage or discoloration.
2. Soften the glue: Apply a small amount of acetone or acetone-based nail polish remover onto a clean cotton cloth. Gently dab the cloth onto the super glue, allowing the acetone to penetrate and soften the adhesive. Avoid excessive scrubbing, as it may spread the glue or damage the vinyl surface.
3. Scrape off the glue: Once the glue has softened, use a plastic scraper or a putty knife with a rounded edge to carefully scrape away the softened glue. Be cautious not to scrape too forcefully, as this may scratch or gouge the vinyl flooring. Work slowly and steadily, using gentle pressure.
4. Repeat if necessary: For tougher glue stains, you may need to repeat steps 2 and 3 until all traces of the super glue have been removed. It’s important to always use fresh acetone or nail polish remover and a clean cloth for each application.
5. Clean the area: After removing the super glue, clean the area with warm water and a mild detergent to remove any residue from the acetone or nail polish remover. Rinse thoroughly and dry the floor with a clean cloth.
Remember to work in a well-ventilated area while using acetone or nail polish remover, and always follow the safety instructions on the product label. With these steps and precautions, you can effectively remove super glue from your vinyl flooring without causing any damage.
Once you have removed the adhesive using the steps above, it is important to properly maintain your vinyl flooring. Regularly sweep and mop with a mild detergent to remove any dirt or debris that may have accumulated on the surface. If you notice any spots of adhesive residue that remain despite your best efforts, try using a product specifically designed for removing sticky residue or contact a professional for assistance