Guide To Repairing Scratches On Vinyl Flooring
Tired of scratches on your vinyl flooring? Our easy, do-it-yourself guide helps you repair scratches effectively, restoring your floor’s original shine. Get started now!
Vinyl flooring is a popular choice for many homeowners due to its durability, style, and affordability. However, like any other flooring material, it’s not immune to damage. Scratches can occur over time, affecting the aesthetic appeal of your vinyl flooring. This comprehensive guide will provide you with all the information you need to repair scratches on your vinyl flooring, as well as tips for maintaining it to prevent future damage.
Key Takeaways
- Mats and protective pads can prevent scratches, while regular cleaning and maintenance can also help prevent them.
- There are two types of scratches: surface scratches and deep scratches. It’s important to assess them before deciding on a repair method.
- Tools for repairing vinyl flooring scratches include a utility knife, putty knife, sandpaper, screwdriver, drill, and damp cloth.
- Repair techniques for scratches vary depending on the severity of the scratch, but may include using polish or wax for light scratches, a special repair kit for softer vinyl materials, and filling in deep scratches with color-matched vinyl filler.
Understanding Vinyl Flooring
Before we delve into the repair process, it’s important to understand what vinyl flooring is and why it’s a popular choice for many homes. Vinyl flooring is a synthetic material that offers high resistance to moisture, stains, and wear. It’s available in a wide range of colors, patterns, and styles, including options that mimic the look of natural stone or wood. This versatility makes it suitable for almost any room in the house.
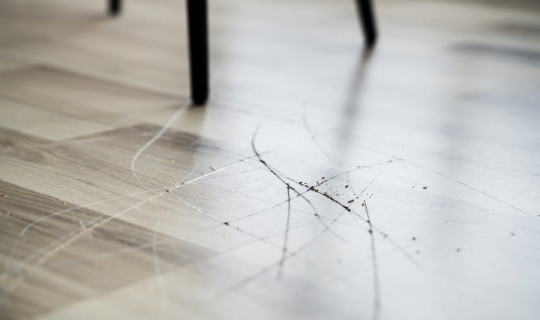
Despite its durability, vinyl flooring can get scratched. These scratches can be caused by various factors, such as dragging furniture, high foot traffic, pet claws, or sharp objects falling onto the floor. The good news is that with the right tools and techniques, you can repair these scratches and restore your vinyl flooring to its original beauty.
Prevention is Better Than Cure
The best way to deal with scratches on your vinyl flooring is to prevent them from happening in the first place. Here are some preventive measures you can take:
- Use Mats and Rugs: Place mats at entrances and rugs in high-traffic areas to reduce the amount of dirt and grit that can scratch your floor.
- Furniture Pads: Use protective pads on the legs of your furniture to prevent them from scratching the floor when moved.
- Regular Cleaning: Regularly sweep or vacuum your floor to remove dirt and grit that can cause scratches.
- Avoid Dragging Furniture: Lift furniture when moving it instead of dragging it across the floor.
- Trim Pet Nails: If you have pets, keep their nails trimmed to prevent them from scratching the floor.
Tools and Materials Needed for Scratch Repair
When it comes to repairing scratches on vinyl flooring, it’s important to have the right tools and materials on hand. Here’s what you’ll need:
- Cleaning Supplies: A paper towel and warm water will be needed to clean the area around the scratch.
- Putty Knife: This is used for scraping away any excess material that may have become stuck in the scratch.
- Cloth: A cloth is used for wiping down the area after the repair.
- Vinyl Repair Kit: This kit contains all the necessary materials for repairing scratches, including a color-matched vinyl filler, a putty knife, and a leveling tool.
How to Assess the Severity of Scratches
Before you start the repair process, it’s important to assess the severity of the scratches. Scratches on vinyl flooring can be classified into two categories:
- Minor Scratches: These are surface scratches that are shallowand can usually be buffed out. They are often caused by everyday wear and tear, such as foot traffic or minor impacts.
- Deep Scratches: These are deeper cuts into the vinyl flooring which require more attention and possibly professional repair. Deep scratches can be caused by dragging heavy furniture, dropping sharp objects, or high-heeled shoes.
Step-by-Step Guide to Repairing Scratches on Vinyl Flooring
Here’s a detailed step-by-step guide to repairing scratches on your vinyl flooring:
- Thorough Inspection:
The first step in repairing scratches on your vinyl flooring is to conduct a thorough inspection. Start by clearing the area of any furniture or rugs to give you a clear view of the floor. Then, walk around the room and carefully examine the floor for any visible scratches.
Use a flashlight to illuminate the floor, as this can help highlight scratches that may be difficult to see under normal lighting conditions. Pay particular attention to high-traffic areas and places where furniture has been moved, as these are common places for scratches to occur.
- Classify the Scratches:
Once you’ve identified the scratches, the next step is to classify them. This involves determining whether the scratches are minor or deep.
Minor scratches are shallow and typically only affect the surface of the vinyl. They can often be buffed out with a soft cloth and a non-abrasive cleaner.
Deep scratches, on the other hand, penetrate into the vinyl and require a more intensive repair process. They are often caused by sharp objects or heavy furniture being dragged across the floor.
- Preparing the Area:
After classifying the scratches, you’ll need to prepare the area for repair. This involves cleaning the area around the scratch to remove any dust or debris that could interfere with the repair process.
Use a damp cloth to wipe down the area, making sure to clean a wide radius around the scratch. For larger scratches, you may need to use a putty knife to gently scrape away any loose pieces of vinyl. Be careful not to cause further damage to the floor during this process.
- Repairing the Scratch:
The repair process will depend on the severity of the scratch. For minor scratches, you can often buff them out using a soft cloth and a non-abrasive cleaner. Apply the cleaner to the cloth and gently rub it over the scratch in a circular motion. This can often help to smooth out the scratch and blend it in with the surrounding floor.
For deep scratches, you’ll need to use a vinyl repair kit. These kits typically contain a color-matched vinyl filler that can be used to fill in the scratch. Start by applying the filler to the scratch using the provided applicator. Make sure to apply enough filler to completely fill in the scratch, but avoid applying too much as this can make the repair more noticeable.
Once the filler has been applied, use a putty knife to smooth out the surface. This involves gently scraping the knife over the filler to remove any excess and create a smooth, level surface.
After the filler has dried (this usually takes a few hours), you can use a fine-grit sandpaper to further smooth the surface. Be sure to sand lightly and evenly to avoid causing further damage to the floor.
- Finishing Touches:
After the scratch has been repaired, the final step is to apply a floor wax or polish. This will restore the shine to your vinyl flooring and help protect it from further scratches.
Choose a wax or polish that’s specifically designed for vinyl flooring. Apply it to the floor according to the manufacturer’s instructions, making sure to cover the entire floor for a uniform finish.
Once the wax or polish has dried, you can replace any furniture or rugs that were moved during the repair process. Be sure to lift the furniture rather than dragging it to avoid causing new scratches.
Remember, the key to preventing scratches is regular maintenance and careful handling of furniture and other heavy objects.
Maintaining Your Vinyl Flooring
Proper maintenance is key to keeping your vinyl flooring looking great and preventing future scratches. Here are some maintenance tips:
- Regular Cleaning: Regularly sweep or vacuum your floor to remove dirt and grit that can scratch the floor. When mopping, use a damp mop and a cleaner specifically designed for vinyl flooring.
- Prompt Spill Cleanup: If you spill something on your vinyl floor, clean it up immediately to prevent staining or damage.
- Use the Right Products: Avoid using abrasive cleaners or scrubbing tools that can scratch the vinyl. Also, avoid using excessive water as it can seep into the seams and cause the vinyl to lift.
- Regular Polishing: Regularly polish your vinyl floor to maintain its shine and protect it from scratches. Use a polish that’s specifically designed for vinyl flooring.
Frequently Asked Questions
Conclusion
Repairing scratches on vinyl flooring isn’t a difficult task. With the right tools and techniques, you can easily restore your vinyl flooring to its original beauty. The key takeaway here is to prevent scratches from happening in the first place.
Regular cleaning and maintenance will help protect your vinyl flooring from scratches and keep it looking beautiful for years to come. Now you have the knowledge and confidence to tackle any scratches that may appear in the future.