Your Ultimate Guide to Removing Bubbles from Vinyl Flooring
Are bubbles ruining the look of your vinyl flooring? Don’t fret! OkayFlooring presents an easy-to-follow guide to help you remove those pesky bubbles and restore your floor’s pristine condition.
Key Takeaways
- Bubbles in vinyl flooring are often caused by moisture, air pockets, or poor installation.
- To remove bubbles, you can use a needle to puncture them and release the trapped air or moisture.
- For larger bubbles, you may need to make a small incision, apply adhesive, and then flatten the area.
- It’s important to apply weight to the repaired area and allow it to dry for at least 24 hours.
- If the problem persists, it may be necessary to replace the entire section of flooring.
What Causes Bubbles in Vinyl Flooring?
Vinyl flooring is a popular choice for many homeowners due to its durability, affordability, and easy maintenance. However, one common issue that can occur with vinyl flooring is the formation of bubbles. These unsightly bubbles not only detract from the overall appearance of the flooring but can also be a tripping hazard. Understanding what causes bubbles in vinyl flooring is essential in order to prevent and address this problem effectively.
Bubbles can form due to a variety of reasons, including improper installation, adhesive failure, moisture issues, or temperature fluctuations. It is important to identify the root cause of the problem in order to effectively eliminate the bubbles and restore the integrity of the flooring. In the following sections, we will explore some practical steps and techniques to get rid of bubbles in vinyl flooring.
Tools Needed to Fix Bubbles in Vinyl Flooring
When it comes to fixing bubbles in vinyl flooring, having the right tools is essential. Here are a few tools you’ll need to effectively fix those pesky bubbles:
1. Hot Iron: A hot iron is an effective tool for fixing bubbles in vinyl flooring. Start by placing a clean cloth over the bubble and then gently apply heat using the hot iron. Be careful not to apply too much heat as it can damage the vinyl.
2. Hair Dryer: Another tool that can be used to fix bubbles in vinyl flooring is a hair dryer. Set it to a low heat setting and direct the warm air towards the bubble. Use a wet cloth to press down on the bubble while heating it with the hair dryer. This will help the vinyl to soften and stick back to the floor.
3. Sewing Needle: A sewing needle can be useful for small bubbles in vinyl flooring. Gently puncture the bubble with the needle and press down to release the trapped air. Apply pressure afterwards to ensure the vinyl adheres to the floor.
4. Wet Cloth: A wet cloth is handy for cleaning the surface of the vinyl flooring before attempting to fix the bubbles. Simply dampen the cloth with soapy water and wipe the area around the bubble to remove any dirt or debris.
Step 1: Clean the Surface
Before attempting to fix bubbles in vinyl flooring, it is important to start with a clean surface. This step ensures that any dirt or debris is removed, allowing for a strong adhesive bond when fixing the bubbles. By following these simple instructions, you can effectively clean the surface of your vinyl flooring and prepare it for the bubble-fixing process.
To begin, gather a wet cloth and prepare a solution of warm water and mild soap. Dampen the cloth with the soapy water and gently scrub the area surrounding the bubble on the vinyl flooring. This will help remove any dirt, dust, or residue that may interfere with the adhesive bond. Be sure to pay extra attention to the immediate area around the bubble.
Once you have thoroughly cleaned the surface, rinse the cloth with clean water and wipe away any soap suds from the vinyl flooring. It is crucial to ensure that no soapy residue remains as this can negatively affect the bond between the vinyl and the adhesive.
After completing this step, allow the surface to air dry for a brief period of time. It is important to ensure that the vinyl flooring is completely dry before proceeding to fix the bubbles. This will guarantee a stronger and longer-lasting bond between the vinyl and the floor.
Removing Dirt and Dust from the Surface
Before attempting to fix bubbles in your vinyl flooring, it’s crucial to start with a clean surface. Cleaning the surface ensures that any dirt and dust are removed, allowing for a strong adhesive bond when fixing the bubbles. Here’s a step-by-step guide on how to remove dirt and dust from the surface of your vinyl flooring:
1. Gather the necessary tools and materials: You’ll need a broom, a dustpan, a vacuum cleaner with a brush attachment, a mop or a damp cloth, and a mild cleaning solution specifically designed for vinyl flooring.
2. Clear the area: Remove any furniture or objects from the area where you’ll be working. This will make it easier to access and clean the entire surface.
3. Remove loose dirt and dust: Start by sweeping the entire surface of the vinyl flooring with a broom. Gather the dirt and dust using a dustpan. Alternatively, you can use a vacuum cleaner with a brush attachment to effectively collect any loose particles.
4. Wet clean the surface: Dilute the mild cleaning solution according to the manufacturer’s instructions. Using a mop or a damp cloth, apply the cleaning solution to the vinyl flooring. Ensure that the mop or cloth is damp, not dripping wet, to prevent excess water from seeping into the bubbles.
5. Scrub gently: With the mop or cloth, gently scrub the surface, focusing on areas with dirt and stains. Pay extra attention to the immediate vicinity of the bubbles.
6. Rinse and dry: Rinse the mop or cloth with clean water, and wipe away any remaining cleaning solution from the vinyl flooring. Allow the surface to air dry completely before proceeding with bubble fixing.
Preparing the Area for Repair
To effectively repair bubbles in vinyl flooring, it is crucial to properly prepare the area beforehand. Follow these steps to ensure a clean and well-prepared surface for the repair:
1. Clean the surface: Start by thoroughly cleaning the vinyl flooring to remove any dirt, dust, or debris. Sweep the entire surface with a broom to gather loose particles. Vacuum the area using a brush attachment to collect any remaining dirt. For stubborn stains, consider using a mild cleaning solution specifically designed for vinyl flooring. Dilute the solution according to the manufacturer’s instructions and mop the surface gently.
2. Remove objects: Clear the area of any furniture, rugs, or other objects that may hinder your repair process. This will give you better access to the entire surface and allow you to work more efficiently.
3. Ensure good ventilation: Proper ventilation is essential during the repair process to allow any fumes or odors from adhesives or sealants to dissipate. Open windows and doors or use fans to promote air circulation. This will help maintain a comfortable and safe environment while you work on repairing the bubbles.
Step 2: Remove Air Bubbles with a Hot Iron
Vinyl flooring is a popular choice for its durability and easy maintenance. However, over time, air bubbles can form, causing an unsightly and uneven surface. Luckily, there are ways to fix this issue and restore your vinyl flooring to its smooth and flawless state. One effective method to remove air bubbles is by using a hot iron. This technique uses heat to soften the vinyl and re-adhere it to the subfloor.
Before proceeding with this method, ensure that the surface is clean and free of any debris or dirt. Additionally, make sure to have good ventilation in the room to allow any fumes to dissipate. With these preparations in place, you can confidently move on to the next step in the process of removing air bubbles from vinyl flooring.
Setting Up an Iron for Bubble Removal
One of the most effective methods for removing bubbles in vinyl flooring is by using a hot iron. Before starting the process, it is essential to set up the iron correctly. Here are the steps to follow:
1. Choose the right iron: Ensure that the iron you are using is clean and in good working condition. It should have a heat setting that can be adjusted.
2. Prepare a safe working area: Find a sturdy and heat-resistant surface, such as a table or an ironing board, to set up the iron. Place a towel or cloth over the surface to protect it from any heat damage.
3. Plug in the iron: Locate a nearby power outlet and plug in the iron. Check if the cord is long enough to comfortably reach the vinyl flooring that needs bubble removal.
4. Adjust the heat setting: Turn the iron on and adjust the heat setting based on the manufacturer’s recommendations for vinyl flooring. It is important to use a temperature that is not too high, as excessive heat can damage the vinyl.
5. Allow the iron to heat up: Give the iron a few minutes to reach the desired temperature.
Once you have set up the iron properly, you can proceed with the process of removing bubbles from the vinyl flooring.
Using an Iron to Remove Air Bubbles
To remove air bubbles from vinyl flooring, you can use an iron to re-adhere the vinyl to the floor. Here’s how to do it:
1. Set up the iron: Begin by selecting a clean iron with an adjustable heat setting. Make sure it is in good working condition. Find a sturdy and heat-resistant surface, like a table or ironing board, to place the iron on. Cover the surface with a towel or cloth to protect it from any heat damage.
2. Adjust the heat setting: Turn on the iron and adjust the heat setting according to the manufacturer’s recommendations for vinyl flooring. It is crucial to use a temperature that won’t damage the vinyl. A medium heat setting is typically safe for vinyl flooring.
3. Heat the vinyl: Give the iron a few minutes to heat up. Gently press the warm iron onto the vinyl bubble for about 30 seconds. Apply slight pressure and move the iron in a circular motion to evenly distribute the heat.
4. Flatten the bubble: After heating the bubble, use a rolling pin or your hand to gradually flatten it. Apply firm pressure to ensure the adhesive bond properly.
5. Allow it to cool: Give the vinyl floor some time to cool down and the adhesive to set. Avoid walking on the treated area for at least 24 hours to allow the vinyl to fully adhere to the floor.
Additional tips and precautions:
– Always clean the vinyl surface before attempting to remove bubbles. Dust and dirt can prevent proper adhesion.
– If the vinyl bubble is large or stubborn, you can try using a hairdryer to heat the area or a sewing needle to puncture and release trapped air.
– Be cautious with the iron’s heat setting. Excessive heat can damage the vinyl flooring.
– If the bubble persists or the vinyl is damaged, consult a professional for repair or replacement.
By following these steps and taking precautions, you can effectively remove air bubbles using an iron and restore the smooth appearance of your vinyl flooring.
Step 3: Apply Heat with a Hair Dryer
If you’re dealing with a stubborn or larger vinyl bubble, an alternative method to remove air bubbles from vinyl flooring is to use a hair dryer. Applying heat can soften the vinyl and make it more pliable, allowing it to re-adhere to the surface. Here’s how to use a hair dryer to remove bubbles from your vinyl flooring:
1. Prepare the area: Start by clearing the surrounding area and making sure it is free from any objects or obstacles. This will give you enough space to work and prevent any accidents.
2. Set the hair dryer: Plug in the hair dryer and select a medium heat setting. Hold the hair dryer about 6-8 inches away from the vinyl bubble.
3. Apply heat: Turn on the hair dryer and carefully direct the hot air towards the vinyl bubble. Move the hair dryer in a back-and-forth motion to evenly distribute the heat. Continue heating the area for a few minutes until the vinyl begins to soften.
4. Flatten the bubble: Once the vinyl has softened, use a rolling pin or your hand to gently press down on the bubble. Apply even pressure and smooth out the vinyl to re-adhere it to the floor. You may also use a clean cloth or towel to help flatten the bubble.
5. Allow it to cool: After flattening the bubble, allow the vinyl to cool for a few minutes. This will help the adhesive bond properly and ensure that the vinyl stays in place.
Remember to exercise caution when using a hair dryer, as excessive heat can damage the vinyl flooring. If the bubble persists or the vinyl is damaged, it’s always best to consult a professional for repair or replacement.
Setting Up a Hair Dryer for Bubble Removal
To set up a hair dryer for bubble removal on vinyl flooring, follow these steps:
1. Ensure the hair dryer is clean and free from any blockages. Remove any dust or debris that might interfere with the airflow.
2. Plug in the hair dryer and set it to a medium heat setting. It is important not to use high heat settings, as this can damage the adhesive backing of the vinyl stickers or flooring.
3. Hold the hair dryer about 6-8 inches away from the vinyl bubble. This distance allows for an even distribution of heat without applying too much heat to the adhesive backing.
4. Begin by directing the hot air towards the edge of the bubble, moving the hair dryer in a back-and-forth motion. Gradually work your way towards the center of the bubble.
5. Continue applying heat for a few minutes until the vinyl begins to soften. Be careful not to overheat the vinyl, as this can cause it to warp or lose its shape.
6. Once the vinyl has softened, use a soft cloth or towel to gently press down on the bubble. Apply even pressure and smooth out the vinyl to re-adhere it to the floor.
7. Allow the vinyl to cool for a few minutes. This will ensure that the adhesive bond properly and help the vinyl stay in place.
Using Heat to Pop Larger Bubbles Under Vinyl Flooring
If you have larger bubbles under your vinyl flooring, using heat can help to remedy the situation. One method is to use a hot iron to pop the bubbles and reattach the vinyl to the floor.
To start, make sure the area is clean and free from any debris. Plug in the hot iron and set it to a low or medium heat setting, as high heat can damage the vinyl flooring.
Next, place the hot iron over the bubble and slowly move it back and forth to evenly distribute the heat. As the vinyl begins to soften, you can use a sharp utility knife or scissors to make an “X” cut in the center of the bubble. Be careful not to cut too deep, as you don’t want to damage the flooring underneath.
Once the “X” cut is made, apply vinyl flooring adhesive to the exposed edges of the cut. Using a putty knife, press the triangle-shaped cuts back into place, ensuring they are firmly bonded to the floor.
To hold the fixed vinyl flooring pieces in place while they set and dry, place a piece of waxed paper over the area and then stack heavy books or other weighted objects on top. Leave the weights in place for an extended period of time, preferably overnight, to allow the adhesive to bond properly.
Using heat to pop larger bubbles under vinyl flooring can help to restore the smooth and seamless appearance of your floor. Remember to always follow the manufacturer’s instructions for any adhesive or repair products you use during the process.
Step 4: Use Soapy Water and Wax Paper to Get Rid of Smaller Bubbles
For smaller bubbles in vinyl flooring, there is a simple and effective technique that involves using soapy water and wax paper. Start by mixing a few drops of mild dish soap with warm water to create a soapy solution. Dip a cloth or sponge into the soapy water and gently clean the surface of the bubble, removing any dirt or debris that may be trapped underneath. This step ensures that the area is clean and allows for better adhesion.
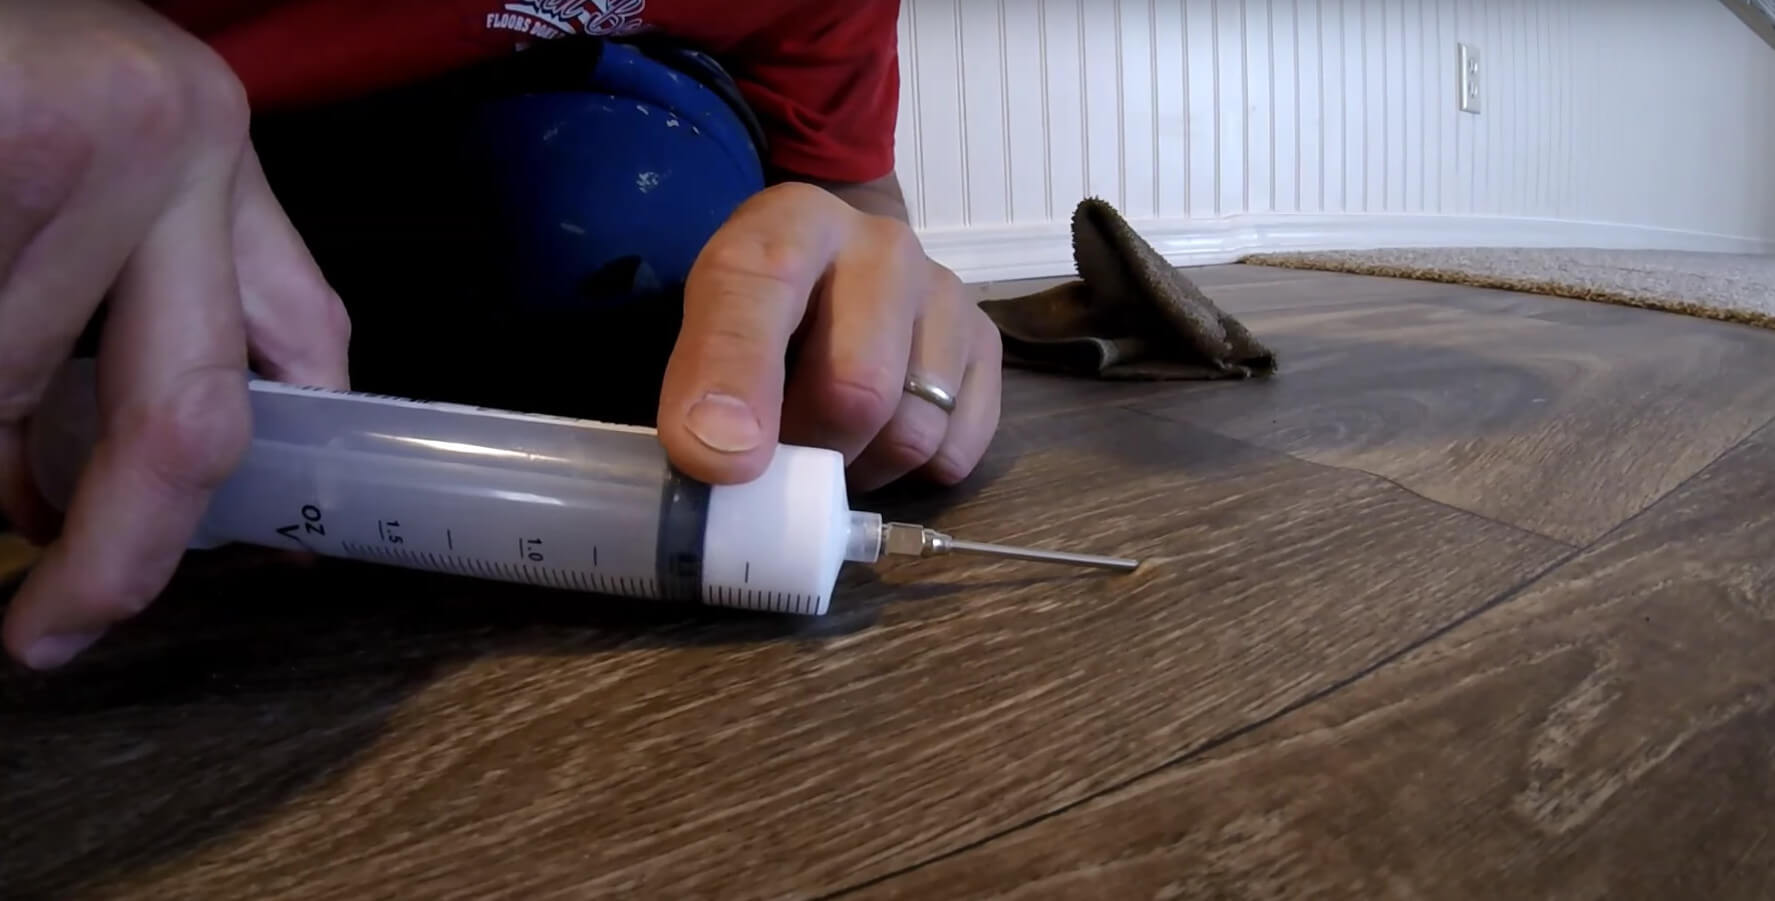
Once the bubble is clean, take a sewing needle and carefully puncture the bubble at its edge. Insert the needle at a slight angle, being cautious not to penetrate the flooring beneath. Gently press down on the bubble to release any trapped air.
Next, dip a clean cloth into the soapy water solution and wring out any excess liquid. Place the damp cloth over the punctured bubble and use a heat source such as a hairdryer or heat gun on a low setting to warm the area. The heat will help soften the vinyl, allowing it to bond with the subfloor and eliminate the bubble.
After heating the area, remove the cloth and place a piece of wax paper over the bubble. Smooth the wax paper down with your hand to ensure it adheres to the vinyl surface.
To apply pressure and aid in the bonding process, place heavy objects, such as books or weights, on top of the wax paper. Leave the weights in place for a period of time, preferably overnight, to allow the adhesive bond to set and the bubble to flatten completely.
Mixing Soapy Water Solution
To effectively get rid of bubbles in vinyl flooring, a soapy water solution can be a great help. Start by mixing a proper solution by adding one teaspoon of mild dish soap to a gallon of warm water. This ratio ensures a balanced solution that is not too soapy and won’t leave residue on the vinyl surface.
However, when dealing with vinyl decals, it’s important to avoid applying the soapy water solution directly. This is because the solution can interfere with the adhesive on the decals. Instead, apply the solution to a cloth or sponge and gently clean the surface of the bubble, removing any dirt or debris that may be trapped underneath. This step ensures that the area is clean and allows for better adhesion.
By using a carefully mixed soapy water solution and applying it correctly, you can effectively eliminate bubbles in vinyl flooring without any potential drawbacks like adhesive interference.
Applying Soapy Water and Wax Paper to Get Rid of Smalller bubbles
To get rid of smaller bubbles in vinyl flooring, one effective method is to apply a soapy water solution and use wax paper to flatten them out. Here’s how you can do it:
1. Mix a soapy water solution: In a bucket or bowl, mix hot water with a commercial cleaning formula or a mixture of hot water and vinegar. This solution will help to loosen the adhesive and make it easier to manipulate the bubbles.
2. Apply the soapy water solution: Take a clean cloth or sponge and dampen it with the soapy water solution. Avoid applying the solution directly to the vinyl flooring to prevent any interference with the adhesive. Instead, gently dab the cloth or sponge onto the bubble, ensuring that the area is thoroughly wetted.
3. Place the wax paper over the bubble: Take a piece of wax paper and place it directly over the wetted bubble. Ensure that the wax side is facing down towards the bubble.
4. Flatten the bubble: Using gentle pressure, firmly press down on the wax paper and rub it over the bubble. This gentle pressure helps to redistribute the adhesive and encourages the bubble to adhere back to the floor.
5. Let it dry: Allow the area to dry completely before walking on it or applying any additional weight. This will ensure that the adhesive fully sets and prevents any further bubbling.
By applying a soapy water solution and using wax paper, you can effectively eliminate smaller bubbles in your vinyl flooring. Remember to take caution and avoid using excessive force to prevent any damage to the flooring.
Step 5: Use Sewing Needle or Wet Cloth to Pop Remaining Air Molecules
If you still have a few stubborn bubbles remaining in your vinyl flooring after following the previous steps, you can try using a sewing needle or a wet cloth to pop the remaining air molecules. Here’s how:
1. Sewing Needle Method: Take a sterilized sewing needle and carefully puncture the center of the bubble. Gently press the needle into the vinyl until you reach the adhesive beneath. Be cautious not to damage the surrounding vinyl or create a larger hole. This method helps release the trapped air and allows the bubble to flatten out.
2. Wet Cloth Method: Alternatively, you can use a wet cloth to apply heat to the surface of the bubble. Wet a cloth with warm water and wring out any excess moisture. Place the damp cloth over the bubble and use a hair dryer on a low heat setting to apply gentle heat to the area. The heat will soften the vinyl, allowing it to relax back into its original position. As the vinyl cools, the bubble should disappear.
Remember to take extra care when using the sewing needle and ensure you are puncturing only the bubble and not the surrounding vinyl. If you opt for the wet cloth method, avoid using excessive heat that could damage the vinyl.
Step 6: Clean and Maintain Vinyl Flooring for a Long-Lasting Finish
Now that you have successfully eliminated any air bubbles from your vinyl flooring, you can ensure a long-lasting finish by taking proper care of the surface. Regular cleaning and maintenance will help to keep your floor looking its best and prevent future bubbling. Here’s how:
1. Vacuum Regular ly: Vacuuming your floors regularly will help to remove any dirt, dust, hair, and other debris that could accumulate on the surface. This will prevent any permanent staining or damage from occurring.
2. Use Mild Soap: When cleaning vinyl flooring, use a mild soap or a commercial cleaning product specifically designed for vinyl floors. Avoid using abrasive cleaners or sponges that could scratch the surface.
3. Dry Immediately: After washing, make sure to dry the floor immediately. This will reduce the chance of water staining or any further bubbling from occurring.
Prevent Future Bubbling
To prevent future bubbling from occurring in your vinyl flooring, you must take steps to protect it from dirt and debris. Because dirt can act as a barrier between the vinyl and adhesive, trapping air molecules beneath the surface, regular cleaning is essential for maintaining a smooth finish. Make sure to vacuum the area frequently to remove any dirt or dust that has collected on the surface.
Additionally, remove any water or moisture immediately to prevent water from becoming trapped beneath the vinyl surface. If you must mop, use a damp cloth or mop rather than soaking it and be sure to dry afterwards as well. In areas where water is more likely to collect, such as bathrooms and kitchens, consider using a vinyl flooring sealant to help protect against
By taking these simple steps, you can keep your vinyl flooring looking its best for years to come.
Now that you know how to get bubbles out of vinyl flooring, you can ensure a smooth and long-lasting finish. Remember to take caution when using the sewing needle method and avoid using excessive force or heat that could damage the surface. With regular cleaning and maintenance, you can keep your vinyl floor looking its best for years to come.