How To Remove Hardwood Flooring For Reuse
Removing hardwood flooring for reuse can be a rewarding and cost-effective project, but it requires careful planning and execution. As…
Removing hardwood flooring for reuse can be a rewarding and cost-effective project, but it requires careful planning and execution. As someone who has tackled this task before, we understand the importance of taking your time and being mindful of the wood’s condition.
With the right tools and materials, and by following a step-by-step guide, you can successfully remove your hardwood flooring and repurpose it for another project.
Before you begin, it’s important to prepare for the removal process. This includes determining whether the hardwood flooring is nailed down or glued, and whether it’s located in a high-traffic area.
You’ll also want to ensure you have all the necessary tools and materials on hand, such as pry bars, protective gear, and a dumpster or disposal plan for the removed materials.
With these preparations in place, you can begin the process of removing your hardwood flooring, taking care to minimize damage to the wood as you go.
Preparing for the Removal Process
Before ya start takin’ up those old boards, ya gotta make sure ya have all the right tools and protective gear to keep ya safe and make the job easier.
It’s important to protect the flooring you’re not removing, so lay down some cardboard or heavy duty plastic sheeting to prevent scratches or damage.
Wear heavy work gloves and safety goggles to protect your hands and eyes from any flying debris or splinters.
Knee pads are also recommended to keep your knees from getting sore or injured.
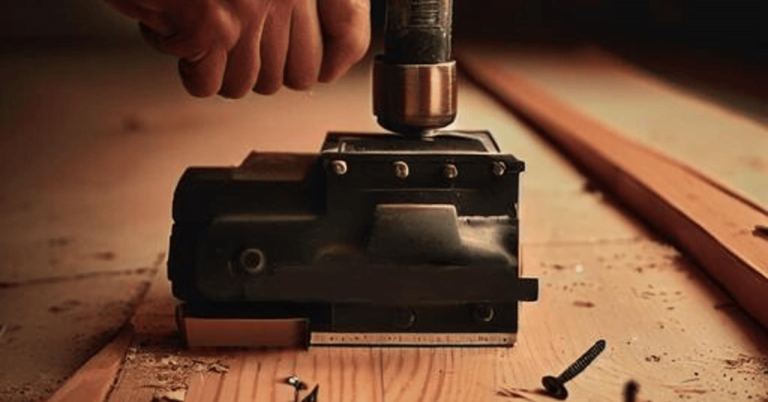
When it comes to removing the hardwood flooring, you’ll need a few essential tools.
A pry bar, hammer, circular saw, and reciprocating saw will make the job much easier.
The pry bar and hammer can be used to gently pry up the boards, while the circular saw and reciprocating saw will come in handy for cutting through any nails or staples holding the boards in place.
Make sure to have a container nearby for collecting the nails and staples you remove, as they can be dangerous if left on the ground.
Lastly, it’s important to consider your disposal options for the old hardwood flooring.
If the boards are in good condition, you may be able to reuse them for another project.
If not, check with your local waste disposal facility to see if they accept hardwood flooring for recycling or disposal.
Some facilities may require special handling or fees for disposal, so it’s important to do your research beforehand.
With the right tools, protective gear, and disposal plan, removing hardwood flooring for reuse can be a satisfying and sustainable DIY project.
Tools and Materials You’ll Need
To make things easier, you’ll wanna grab some tools and materials before you get started with the flooring removal techniques. Here are the things that you will need:
-
Tools: pry bar, crowbar, hammer, circular saw, utility knife, drill, tape measure, safety glasses, gloves, and earplugs.
-
Materials: heavy-duty plastic bags, duct tape, plastic sheeting, and wood filler.
The pry bar and crowbar are important tools for removing the hardwood flooring, while the circular saw and utility knife will help you cut through the wood. You’ll also need a drill to remove any screws or nails holding the flooring in place.
Safety glasses and earplugs are essential for protecting your eyes and ears from flying debris, and gloves will protect your hands from splinters.
Once you’ve gathered your tools and materials, it’s important to consider the environmental impact of flooring removal. Reusing the hardwood flooring is a sustainable option that reduces waste and saves resources. Careful removal and handling of the flooring will ensure that it remains in good condition for reuse.
Be sure to dispose of any waste materials properly and follow local regulations for environmental protection.
In summary, having the right tools and materials is crucial for a successful hardwood flooring removal process. By taking a sustainable approach to the removal process, you can reduce waste and save resources. With proper tools and careful handling, you can remove the flooring in a way that preserves its quality for reuse.
Step-by-Step Guide to Removing Hardwood Flooring
Get ready to transform your space by taking out those old boards! Here’s a step-by-step guide on how you can do it yourself. Removing hardwood flooring for reuse can be a challenging task, but with the right tools and techniques, you can do it without damaging the boards. Before you begin, make sure you have all the necessary tools and materials, including gloves, a pry bar, a hammer, a circular saw, and safety goggles.
To start, remove all the furniture and trim from the room. Then, use a pry bar to remove any baseboards around the perimeter of the room. Once the baseboards are removed, use a circular saw to cut the flooring into manageable sections. Make sure to cut the boards in the opposite direction of the joists to avoid damaging them. After cutting the boards, use a pry bar to remove them from the subfloor. Be careful not to damage the tongue and groove joints.
Once you have removed all the boards, you will need to dispose of the old flooring. You can either recycle the wood or dispose of it in a landfill. If you plan on recycling the wood, make sure to remove any nails or staples from the boards. You can use a hammer or pliers to remove the nails. Then, stack the boards neatly and transport them to a recycling center. If you plan on disposing of the wood in a landfill, make sure to follow your local regulations for waste disposal. By following these steps, you can remove hardwood flooring for reuse and transform your space into something new and beautiful.
Tips for Minimizing Damage to the Wood
You can minimize damage to your old boards by using a pry bar and circular saw in a careful manner, ensuring that you don’t harm the tongue and groove joints. When using a pry bar, start at the end of a board and gently work your way towards the middle, prying up each nail as you go. Avoid using excessive force, as this could cause the board to split or crack.
If you notice any scratches or dents on your old hardwood flooring, you may be able to repair them with wood filler or a touch-up pen. Alternatively, you could opt for a refinishing option that will restore the wood to its former glory.
This could include sanding down the surface, applying a new stain, or adding a protective layer of polyurethane.
Overall, it’s important to take your time and be patient when removing hardwood flooring for reuse. With the right tools and techniques, you can minimize damage to the wood and ensure that it remains in top condition for years to come. Whether you’re planning to install the wood in a new location or simply want to preserve it for future use, the effort you put in now will be well worth it in the long run.
Repurposing Your Old Hardwood Flooring
If you’re feeling creative and want to give your old boards a new purpose, there are plenty of unique and innovative ways to repurpose your old hardwood flooring. Not only is this a great way to add a touch of character to your home, but it also provides environmental benefits by reducing waste.
Here are a few creative projects to consider:
-
One option is to create a beautiful accent wall using your old hardwood flooring. This can be a stunning addition to any room in your home and can add warmth and texture to the space. To create the wall, you’ll need to remove the tongue and groove from the boards and then attach them with a nail gun, adhesive, or both. You can arrange the boards in a herringbone pattern, a straight line, or any other pattern that suits your style.
-
Another creative option is to use your old hardwood flooring to create a unique piece of furniture. You can use the boards to make a coffee table, a bench, or even a headboard for your bed. The possibilities are endless, and the end result is a one-of-a-kind piece that will add character and charm to your home.
In summary, repurposing your old hardwood flooring is a great way to give your home a unique touch while also reducing waste. So, the next time you’re thinking about replacing your hardwood floors, consider repurposing the old boards instead!
Conclusion
Overall, removing hardwood flooring for reuse can be a labor-intensive but rewarding process. By following the steps outlined in this guide and using the proper tools and techniques, you can successfully remove your old flooring and repurpose it for a new project.
Remember to take your time, work carefully, and prioritize safety throughout the process. Whether you’re looking to save money on a new flooring project or simply want to give your old hardwood a new lease on life, reusing your existing materials is a sustainable and environmentally-friendly option.
With a little bit of patience and effort, you can turn your old flooring into a beautiful and functional addition to your home or workspace.